Call forwarding
Call forwarding is a feature for Elevate Users and Resources which allows setting up forwarding profiles that process incoming calls in a preferred way. A call forwarding profile can send an incoming call to several apps/devices/phone numbers simultaneously or sequentially and forward it elsewhere if the call isn't picked up.
Important: No Answer forwarding set up on the phone may interfere with Call forwarding setup. It is highly recommended to have No answer forwarding disabled. Refer to the following article to learn how to check it:
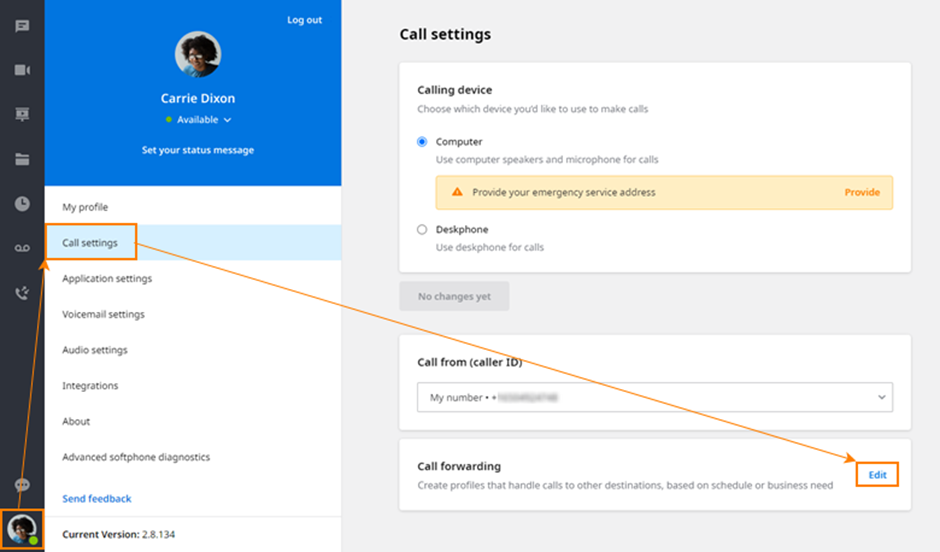
To manage call forwarding from the App click your profile picture, select Call settings > Call forwarding and click Edit.
Configuring profiles
By default, Call forwarding has two profiles: "Default" and "Default: Unavailable for Calls".
The default profile cannot be deleted or deactivated. All incoming calls will be processed according to the configuration of the default profile until there is a custom active profile higher in the list, provided the conditions in this custom profile are met. At the start, the default profile will have all user's devices and Elevate apps ring simultaneously for 30 seconds and will send the call to this user's voicemail if it is unanswered.

The default profile is similar to a custom profile except it doesn't have a schedule option and incoming call type filter option. If you don't need to utilize these features, it might not be necessary to create additional profiles. To edit a profile, click it. You will be presented with the profile configuration. Please see the specific sections found in this article to learn more about features such as Forwarding Type, Presence Status, etc.
The Default: Unavailable for Calls profile reflects the default silent mode settings for the following statuses:
Do not disturb
Out sick
Off work
On vacation
This can be changed by users if they want to receive calls in these statuses instead of silent mode behaviour or they can delete this profile completely. These presence-based status conditions are only available for the custom profile but can be combined with other profile types such as schedule-based and profiles based on incoming call types.
Incoming call type
The call forwarding feature also allows you to specify call types for which the Call forwarding profile will be active.
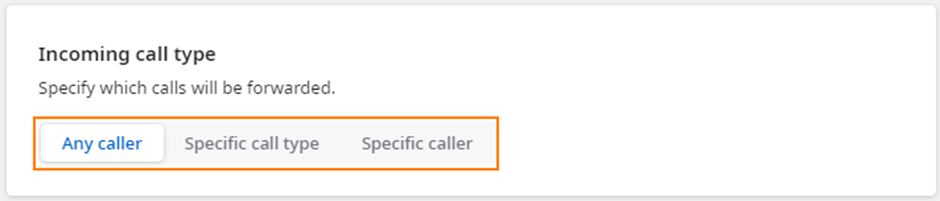
There are three call types:
Any caller — the Call forwarding profile will be active for all incoming calls;
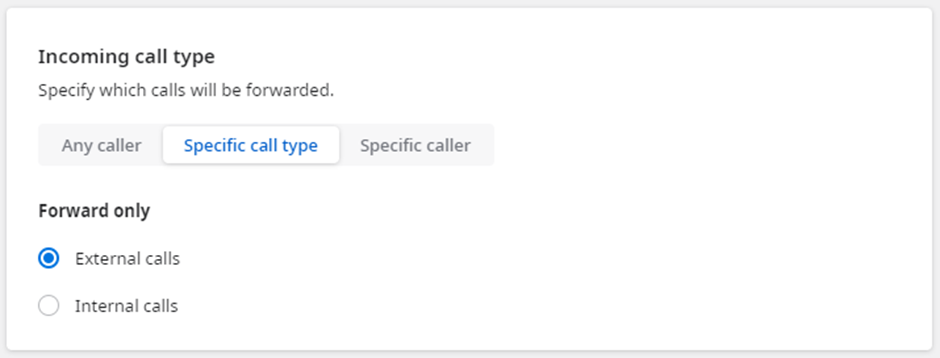
Specific call type:
Internal — the Call forwarding profile will be active for all calls coming from within your company's Elevate account;
External — the Call forwarding profile will be active for all calls coming from outside your company's Elevate account;
Specific caller — the Call forwarding profile will be active for the entities specified below (min 1, max 10):
User
Resource
Virtual extension
Phone number.
Calls that don't match the call type specified in the profile will ignore it and jump to the next one in the queue.
Presence Status
The "Presence status" section is available in CONTROL PANEL for admins and in the Elevate Desktop App for users. The Presence Status settings allow Users to create new types of rules in their custom call forwarding profiles. By default the "Any Status" filter is selected, meaning when call forwarding is enabled the calls will forward no matter which status the user is in. Selecting the "Specific status" option allows you to choose forwarding to occur based on the status(es) selected.
There is a certain standard behavior for 4 Presence statuses: "Do Not Disturb", "Out sick", "On vacation", and "Off work" that puts all user's devices in DND mode. This not only affects the app it was activated on but also the desk phones as well. If one of these four aforementioned statuses is activated on the desktop app, neither the mobile app nor the desktop app will ring. With the Default: Unavailable for Calls profile, users have the ability to change the behavior for these 4 statuses.
This Unavailable profile will appear for each user, without exception, to display and maintain the current behavior of the DND mode and give the opportunity to change it for statuses. The Default: Unavailable for Calls profile has the highest priority in the list of Call Forwarding profiles, thus maintaining the current behavior for DND mode: If Do Not Disturb/Out sick/On vacation/Off work is activated on the app, no devices will ring.
Forwarding Type
The Forwarding Type section allows you to choose a Destination order or Silent Mode. Silent mode will immediately forward calls to voicemail (if enabled), or are dropped (if voicemail is not enabled).
Destination order
The destination order section allows you to add phone numbers, users, resources, and your own devices to which your incoming calls will go. Destinations can be simultaneous (Ring All) and sequential. You can add multiple destinations of both types to the list, however, they will always trigger from top to bottom.
Simultaneous destinations (Ring All) ring to multiple entities at the same time with the preset timeout for the whole destination;
Sequential destinations ring to only one entity at a time with a preset timeout for each entity.
You can add users, resources, phone numbers, and your own devices as destinations.
Phone number — the call will go to an external phone number;
User — the call will go to another Elevate user on the account and will ring to their devices and Elevate apps.
Resource — the call will go to a resource from the account and will ring to the device assigned to this resource.
My device — the call will ring one of the devices assigned to a user/resource. Elevate apps count as devices, too.
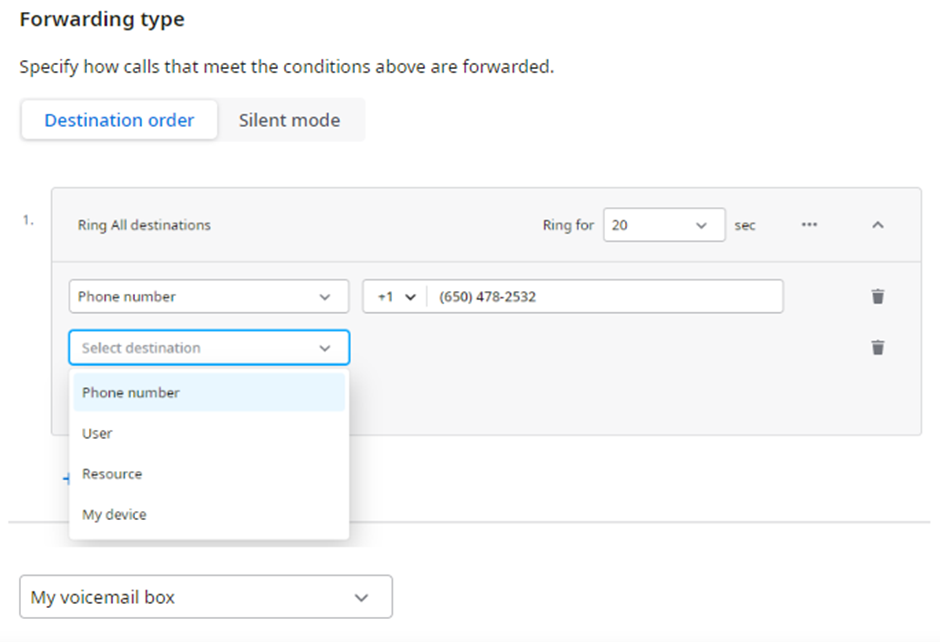
Note: when configuring the Destination order tab and selecting all calls to go to "My voicemail box" then the calls will go to the voicemail after trying all previously configured destinations and the call will not appear in the call history. When configuring the Silent mode tab, calls are sent to voicemail by default; however, the difference with Silent mode is the call will be displayed in the call history.
Ring time
The Ring for feature allows to set up ring time in seconds for each destination. The minimum ring time is 5 seconds and the maximum is 120 seconds. After the number of seconds specified in Ring for box is reached, the call will jump to the next destination or go to the option selected in After trying all destinations above section if no other destinations are left.
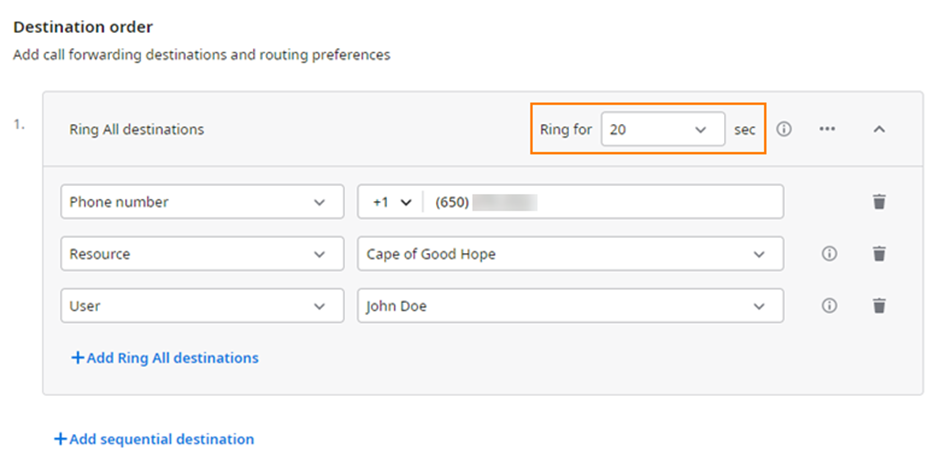
For Ring All destinations, if the specified timeout is smaller than the timeout set for any of the destinations configured, all devices will ring for the largest specified timeout value configured.
Call Forwarding can be set up to send calls from one user or a resource to another user or a resource, which have Call Forwarding profiles with specified ring times, too. In this case, total ring time will be determined by the first user's Call Forwarding rule. Check the example below for more clarification on that logic.
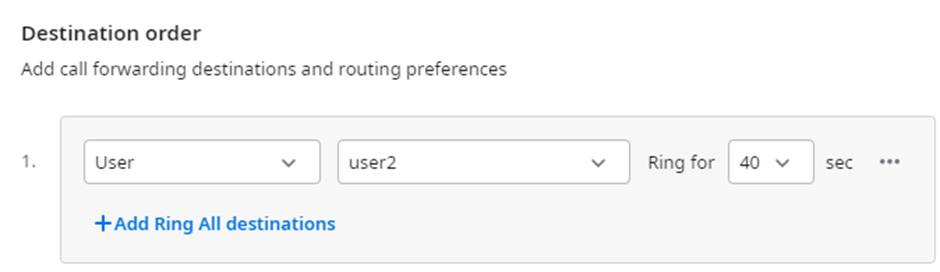
For example, User 1 has his Call Forwarding profile set up to ring to User 2 for 40 seconds. User 2, in their turn, has Call Forwarding profile set up to sequentially ring to three destinations: Device A for 20 seconds, Device B for 20 seconds and Resource C for 15 seconds.
User A CF:
Ring to User 2 for 40 seconds:
User 2 CF:
Ring to Device A for 20 seconds
Then ring to Device B for 20 seconds
Then ring to Resource C for 15 seconds.
The last destination is marked in red because when the call would reach it (Resource C), it will already hit the limit of seconds specified in the User's A Call Forwarding profile rule. Therefore, the call will not go to Resource C and instead will follow the order specified in User's A After trying all destinations above, send calls to feature.
Selecting endpoint
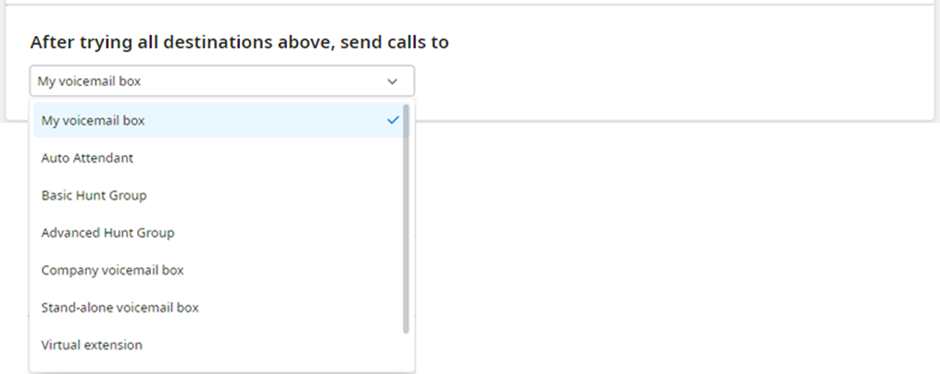
After all destinations were triggered and the call wasn't picked up, it will be forwarded where the After trying all destinations above, send calls to feature tells it to. Currently, there are eight options:
Voicemail — set by default. Sends the call to the voicemail box of the user;
Auto Attendant — sends the call to the selected Auto Attendant;
Basic Hunt Group — sends the call to the selected Basic Hunt Group;
Advanced Hunt Group — sends the call to the selected Basic Hunt Group;
Company voicemail box — sends the call to the Company voicemail box.
Stand-alone voicemail box — sends the call to a Voicemail box resource.
Virtual extension — sends the call to a virtual extension that will forward the call elsewhere.
Hang up after busy — ends the call.
Note: Call forwarding won't allow creating a profile with empty destination order and "Hang up after busy" as an endpoint since such setup can lead to disruption of call flow and missed calls that will be difficult to notice. If you try to configure a profile this way, you will receive a "Please select at least one destination in the destination order" notification.
Destinations priority
When there are multiple destinations, incoming calls will trigger them in order, from top to bottom. To change the priority of a destination, click the three dots button in the top right corner of the destination and select Move up or Move down.
You can also delete existing destinations. If you delete all of them, incoming calls will no longer ring to anything and will be instantly forwarded to the option set up in After trying all destinations above, send calls to feature.
Custom profiles
To create a custom profile, access Call forwarding and click + Create profile in the top right corner.

When creating a new profile, you'll need to type in its name, set up a schedule, add destinations to the destination queue, decide where the call goes if no destinations pick up, and click Create profile button. You can also check the Activate profile after creation checkbox. If you do this, the profile will be activated and moved to the second place from the bottom, right above the Default profile.
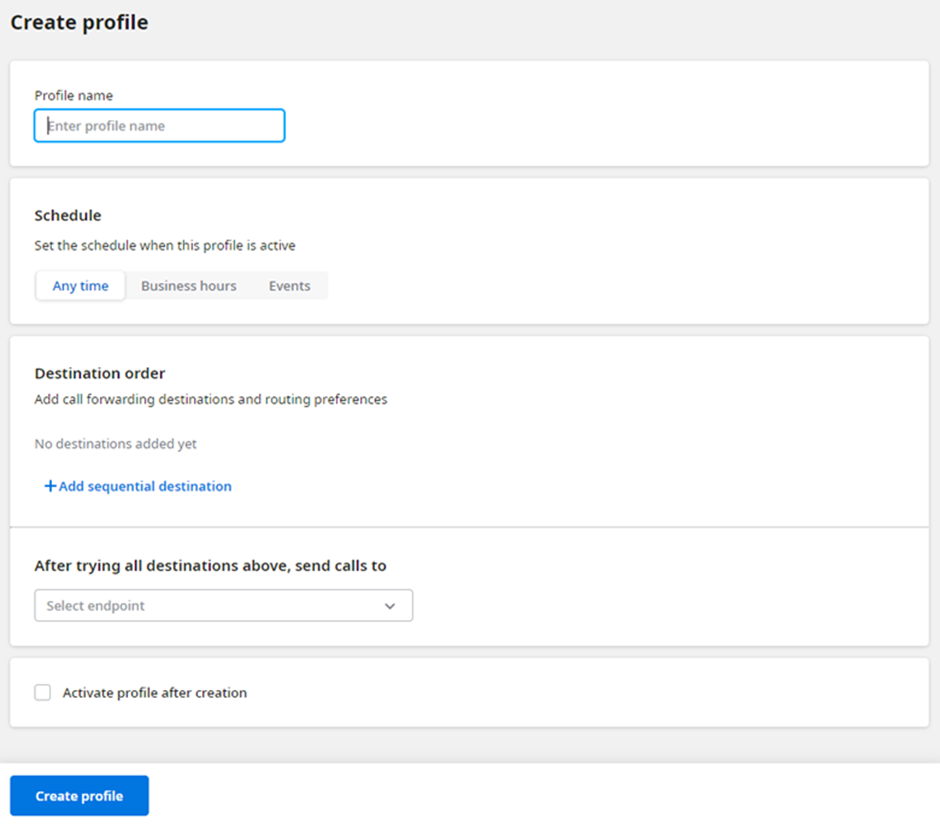
Schedule
The schedule is available only for custom profiles. The default setting is Any time — if it's enabled, the profile will work 24/7. Additional options are Business hours and Events. The schedule will work according to a user's time zone. Read the Elevate Time Zone Overview article to learn how to change time zone for a user.
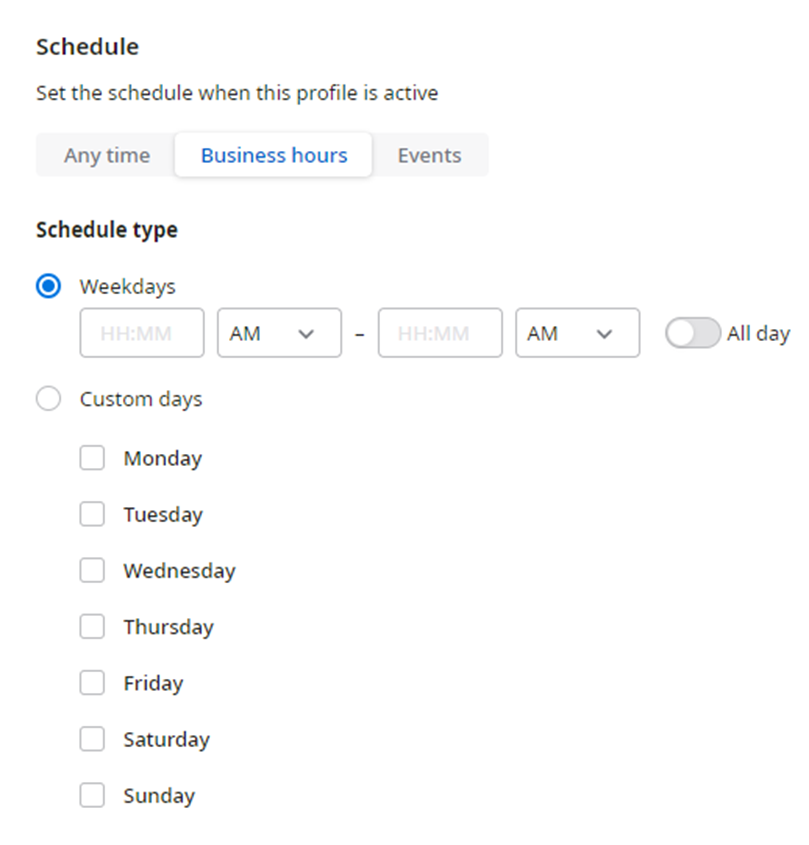
Business hours option allows you to designate the time when your Call forwarding profile will be active through the week. You can either set it up to be active only on weekdays or pick custom days one by one. You can also specify the time when the profile will be active during the day or toggle All day option to make the profile active 24 hours a day.
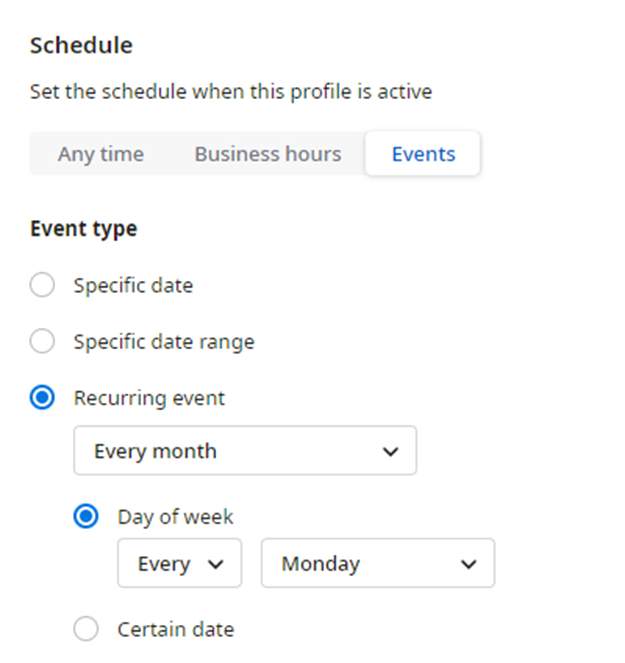
Events option allows you to make the profile active on a specific date or date range and set up recurring events.
Managing profiles
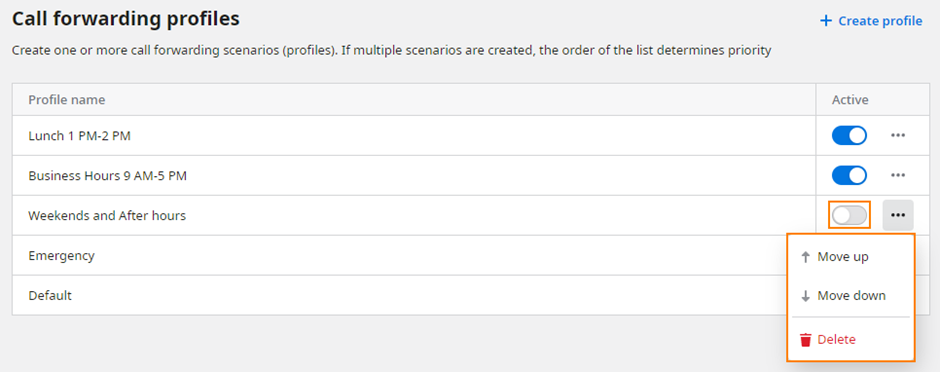
When you create and activate multiple Call forwarding profiles, all your incoming calls will be checked against conditions in these profiles. The call will go to the highest profile in the list which conditions (schedule) it has matched. If several profiles have the same conditions (schedule), the call will go to the one that is higher in priority and will not go to any others. Check an example below to better understand how Call forwarding profiles work.
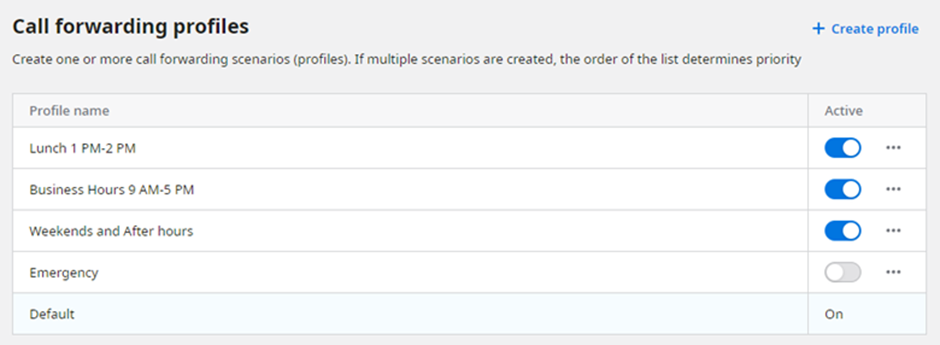
In the example above a user has configured multiple profiles and named them in a way so it will be clear when each profile is active.
Business Hours 9 AM-5 PM profile will take all incoming calls from 9 AM to 5 AM from Monday to Friday. Note that its schedule is overlaying the schedule of the Lunch profile. However, while both profiles are active from 1 PM to 2 PM, the Lunch profile is higher in priority.
Lunch 1 PM-2 PM profile will take all incoming calls received from 1 PM to 2 PM from Monday to Friday, being the top active priority during this time of day.
Weekends and After hours profile is configured to take all incoming calls all the time. However, it's lower in priority than Business hours and Lunch profiles, so it will receive only those calls that didn't match the conditions (schedule) in the profiles that are higher in priority. In other words, it will get all the calls that were received in After hours.
Emergency profile is disabled, so it won't take any calls at all;
Default profile is active, but it won't get any calls because all of them are being caught by custom profiles.
To enable a profile, toggle the button on the right of the profile in the Active column. To change its priority or delete it, click the three dots button on the right of the profile and click Move up, Move down or Delete.