
Number Porting
Creating a new Number Porting request
Once you are logged into CONTROL PANEL, navigate to Services > Elevate > Phone Numbers. Click the Port existing numbers link.
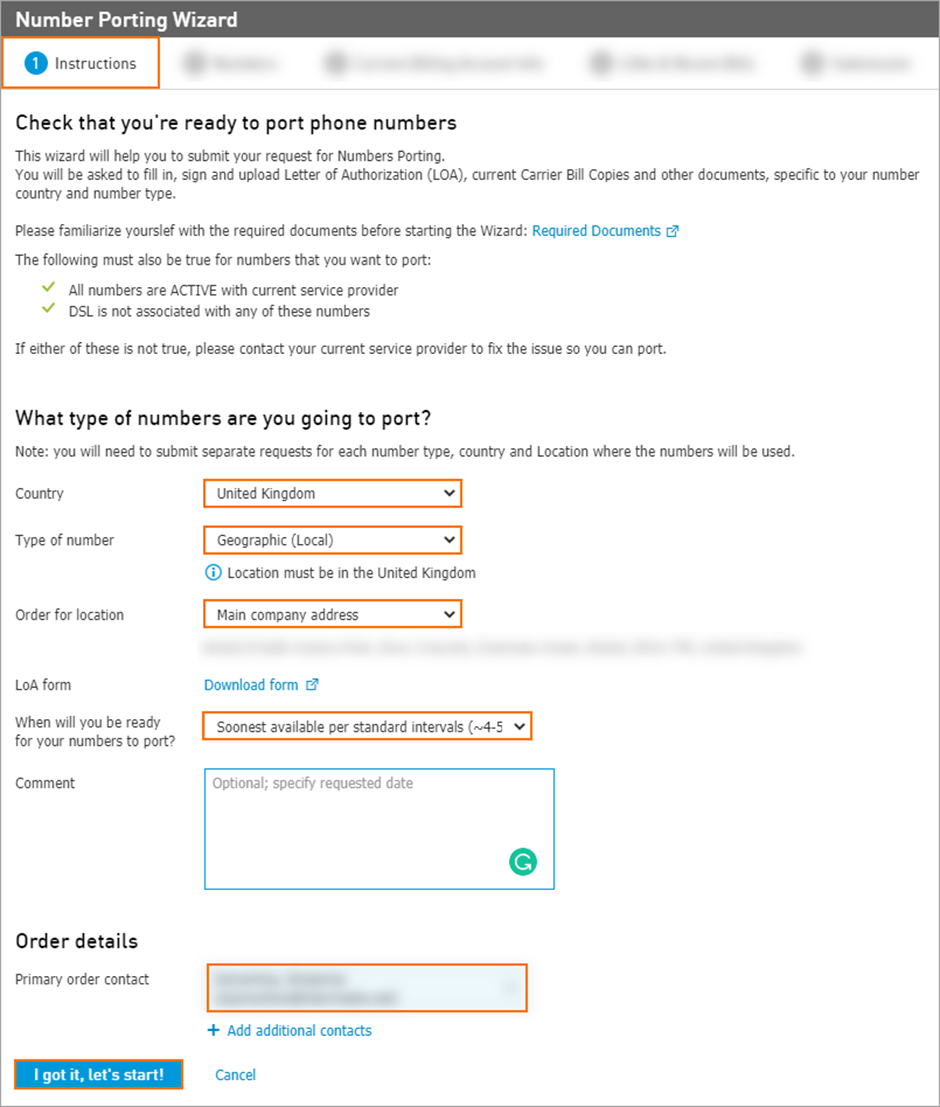
Step 1: Instructions
Choose the the type of number(s) you would like to port:
Geographic (Local) numbers,
Non-Geographic (National) numbers,
Toll-free (Free Phone) numbers.
Select the Location where the numbers will be used.
Identify the timeframe in which you will be ready for your numbers to port. We will submit your porting order request with your current service provider using your preferred porting timeframe as a guide.
Note: the date cannot be sooner than the standard interval. If you have special requests – put them in the Comment section and we will do our best to accommodate them.
Provide the contact email address of all contacts who should be updated on the port order status. We will reach out to these people if there are any issues with your port order.
Note: Submit requests for different number types and for different countries separately. If you are porting numbers from multiple accounts, submit each request separately.
Step 2: Numbers
Enter the number(s) to port in International number format, for example, +44 0000 000 000. As noted, do not put geographic and toll-free numbers in the same order, and do not put numbers from different accounts.
Each number should contain a + (plus) sign, country code, area code, and local number.
(E.G. +44 xxxx xxx xxx)
The following symbols are allowed: - ( ) space
Note: You can copy and paste from an Excel or text file if you have a longer list of numbers.
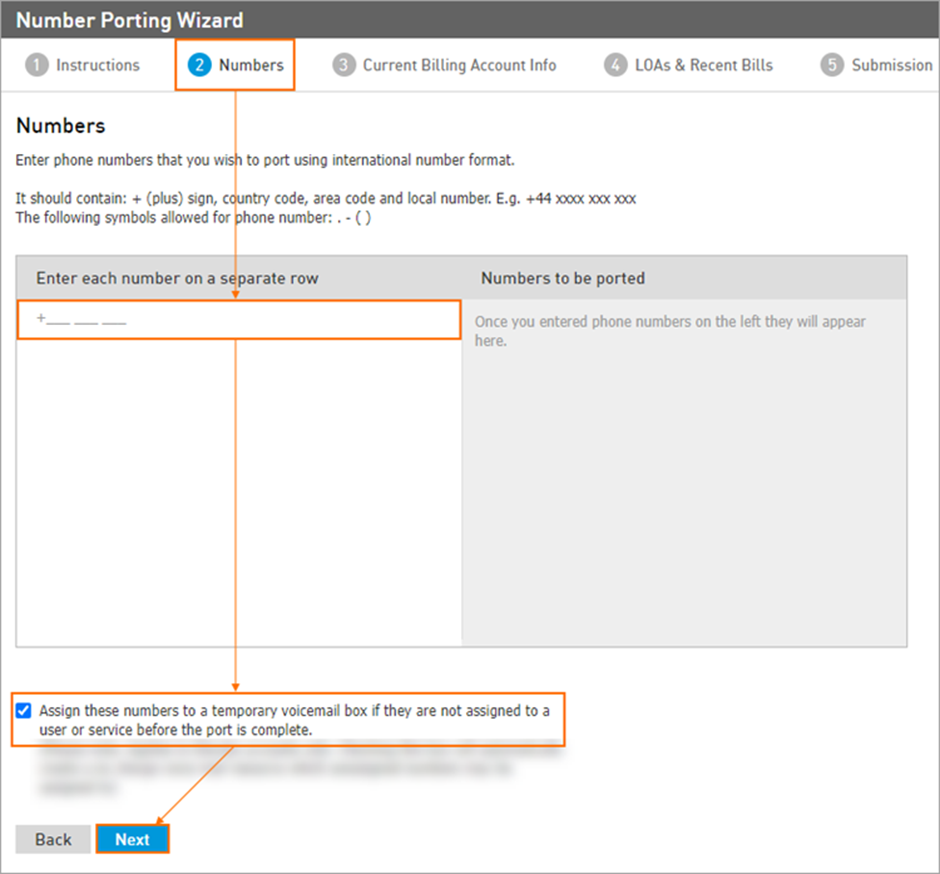
Note: The checkbox below the numbers table tells us if you would like to enable a failsafe for the assignment of your ported numbers. Checking this box will create a temporary voicemail box. Where this option is selected, any numbers which have not already been assigned to a user or service approximately 30 minutes prior to the scheduled porting window start time will automatically be assigned to this voicemail box. After this is complete, we will send the account admin an email notification about any numbers assigned to the temporary voicemail box. When you are ready to assign your numbers to a user or any resource you should un-assign numbers from the temporary voicemail box and assign them to the correct resource. Updates to number assignments (un-assigning and reassigning) typically take 15 minutes to complete in our network. Please allow 15 minutes before testing, and do not repeat the actions in the meantime.
The Assignment of ported numbers to the temporary voicemail box allows callers to receive a pre-configured greeting indicating the number is being moved to a new telephone service, allowing them to leave a message. You can change this greeting and record/upload another one.
Although this feature will prevent callers from receiving an “unreachable number” message and enable them to leave a message, we still strongly encourage that you assign numbers that are porting to the correct user or resource prior to the confirmed porting date.
There is no charge for the temporary voicemail box when enabled for the account.
The Voicemail box for ported numbers assign has the following default settings:
Name - Unassigned Ported Number VM
Extension - 889 (or the first free extension, if 889 is already used)
New voicemail PIN – 8899
Voicemail to email - account owner's email
Location - Main Company address
Greeting file name - Unassigned_Number_VM_Prompt.wav
Once you have the full number list entered, move on to the Current Billing Account Info
Step 3: Current Billing Account Info
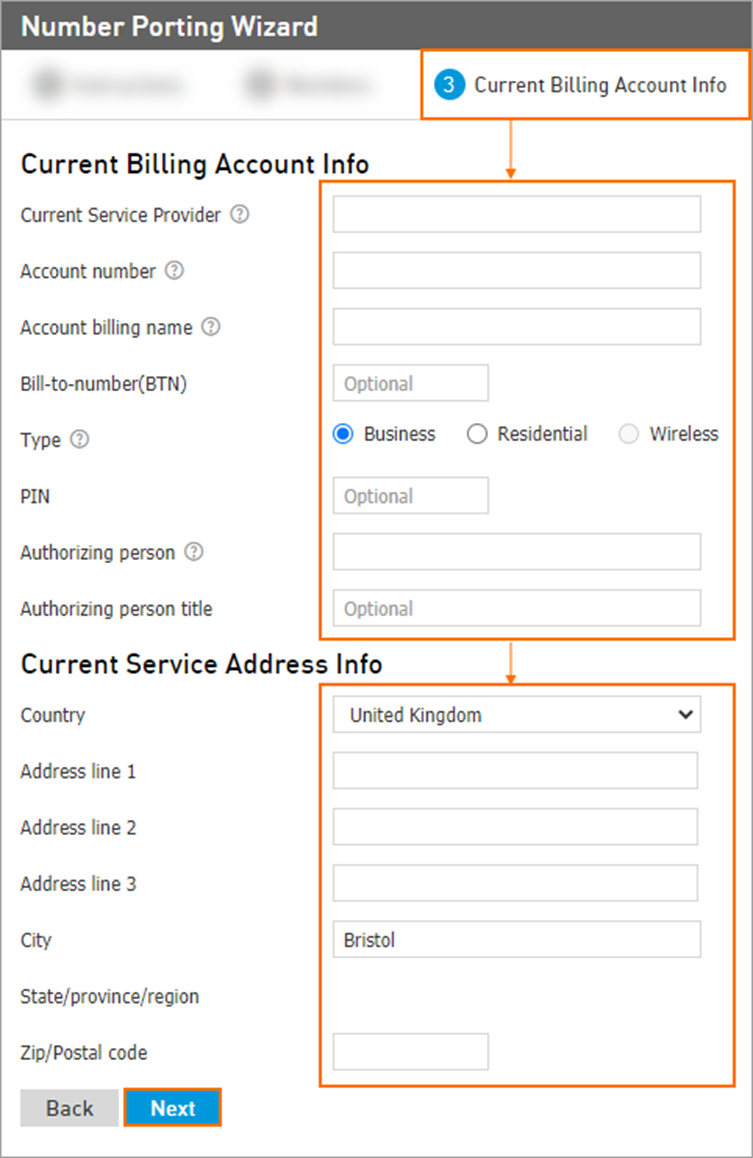
Provide us with your current billing account information (from the current service provider) for the numbers you wish to port. We suggest getting a recent copy of your phone bill from your current service provider for the numbers you are porting - use that as the reference to enter the below information.
For orders to port Geographic or Non-Geographic numbers: show the service address your current provider has on file. For orders to port toll-free numbers: show the billing address on file with your current provider.
In both cases, the Authorizing Person must be listed as an authorized owner or administrator for these numbers with your current provider. If you are submitting this on behalf of an end-user who has already provided you with the LOA (Letter of Authorization), please fill this in with the information they have provided.
Note: you are then required to keep your end user's LOA on file and available for reference.
Step 4: Recent Bills & LOA
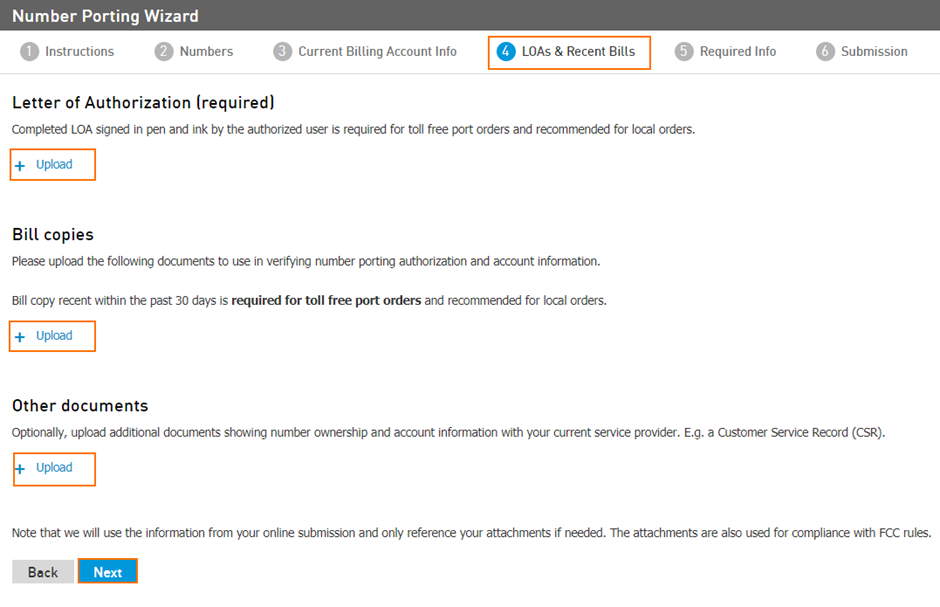
We recommend the following file types for the documents you upload: PDF, DOCX, JPEG, and file size of < 10 MB per file. Where you have multiple pages of a document such as a bill copy, proof of address, or company registration, please combine all pages into a single file. Please note that file types such as TIFF/TIF are specifically not allowed. Please upload no more than 5 total documents.
Please use the Upload buttons to upload:
Mandatory: Letter of Authorization: filled in and pen-and-ink signed.
Note: If the submitter is not the authorized signer, we strongly recommend that a pen-and-ink signed LOA from the authorized signer be uploaded as well
Mandatory: Bill copies from the current carrier for the last 30 days.
Optional: Other documents that you think would be useful to process your request.
Important: LOA can only be provided via the Wizard and not subsequently after the port order has been raised.
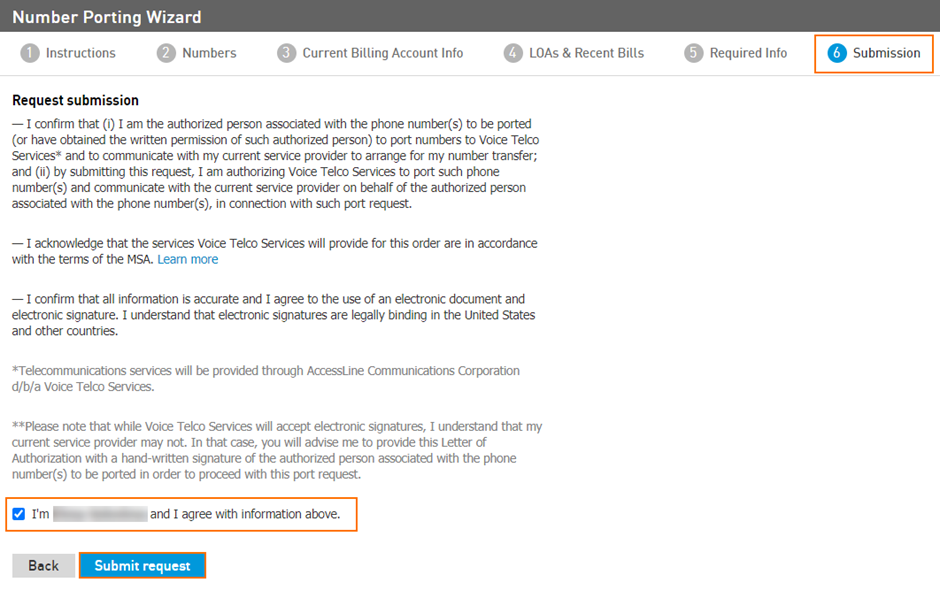
Step 6: Submission
Read the Terms and submit a request by clicking the Submit Request button.
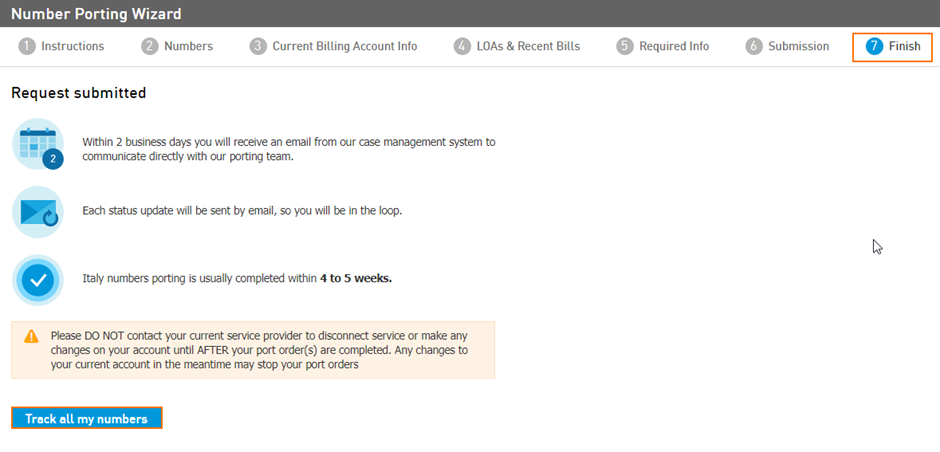
Step 7: Finish
Upon submission, a case will be created in our ticket management system. Our team will start to work on your case and will update you on the status via the email address you provided. We will also contact you if any additional information is required or in case there are any issues with your port request.
Track all my numbers will redirect you to the View porting status page. You can access this page through Services > Elevate > Phone Numbers > View porting status.
Track and open port order
To track an open port order, login to the customer account that the port order relates to:
Go to Services > Elevate at the top.
Go to the Phone Numbers tab on the left side.
If you have already initiated number porting to Company, please click View porting status to check the current status.
The status page shows you the list of all number porting requests with the following statuses:
Completed: We have successfully ported the number(s) to our network. Check to make sure that they are routing as you wish, then contact your previous service provider to cancel any numbers/services you no longer need from them.
In Progress: We currently have all the necessary information from you and are working on your port order. We have/are submitting it to our carrier and your current service provider. We have/will provide an Estimated Porting Date based on the timeframe you requested and the soonest date available from your current service provider. If all information you submitted matches the information currently on file with your service provider, we will provide you with a Confirmed Porting Date. Please check this status every few days for any updates. If we require additional information, we will provide detailed instructions in an email for the associated port request.
Waiting for you: We need some additional information from you.
Important: please check your emails to see the instructions.
Canceled: This indicates that your order to port the numbers shown has been canceled. You may have contacted us to cancel it or we have had to cancel it because we have not received from you the necessary information to proceed.
Scheduled: We have received a firm commitment date from your current phone company to port the numbers. This means that the port order is now final and confirmed; any changes/cancellations made after this will incur charges.
This page also shows:
Request ID – This is the unique ID of your port request in our system. Reference this ID when calling Support.
Number(s) to port.
Estimated Porting Date - this is the date we have requested to port with your current service provider based on the dates they have available, the timeframe you indicated to us, and the nature of your port order and current services. This is not yet confirmed. Any changes to your port order will require your order to start over again, usually with a new estimated porting date.
Confirmed Porting Date - this date has been confirmed with your current service provider; we will port your numbers on this date. Any changes to your port order including the request to change this date may incur charges.
Preparing your numbers for Porting
When preparing your numbers to port, part of our internal process is to add and configure the numbers in the Elevate portal. This is to prepare the account and numbers in question for the incoming port, ensure that the backend routing is pre-configured, and allow you to assign numbers to Users, Groups, or Attendants so that you are ready to receive calls as soon as the port is complete.
Important: The numbers are unassigned and will not work once ported until you do the steps below.
Assigning your number(s) to Services or Users.
You need to assign the numbers to services or users.
Your porting phone numbers will not work until you have done this.
Please make sure you do this in advance of your confirmed port date, where technically possible.
Make sure all phone devices are connected and registered before your numbers port
Complete an Onboarding appointment if you are a new customer to ensure calls will route appropriately. If you have not had your onboarding appointment yet, please contact your Onboarding representative to schedule one.
What to expect when your numbers port
On the date of your scheduled number port, we will work with your current carrier to move your numbers over to our network. Ports are generally seamless and not even noticed by most customers. Calls will start arriving via your Elevate services instead of via your existing phone lines.
We will test, and verify that porting was successfully completed and send you a completion notice via email.
Important: once porting is completed, the numbers will be in the unassigned state and will not work until you assign them to services or users. You can assign phone numbers after or before the porting process is completed, however, it is better to do this in advance of your confirmed port date in order to avoid downtime after numbers are ported.
Additional orders may be in progress and updates will be provided on those separately. To check the status of other port orders, please check our Number Porting Status Viewer available through our CONTROL PANEL. Login to CONTROL PANEL for this account, navigate to Services > Elevate, and click on the View porting status link.
Important: once your numbers are ported, you need to contact your previous service provider to cancel any numbers/services you no longer need from them.