
Setting Or Changing Business Hours Options
Each menu has a list of customisable options that can transfer callers further either to another account object (e.g. user's voicemail, hunt group, dial by name directory, etc.) or to a sub-menu.
To configure it navigate to CONTROL PANEL > Services > Elevate > Auto Attendant > Auto Attendant Name > Business Hours > Business hours Menu in question > Not set up button next to the option you wish to manage.
Click on a number key and choose an option for it. Repeat this for each key you want to use as an option in the Business hours.
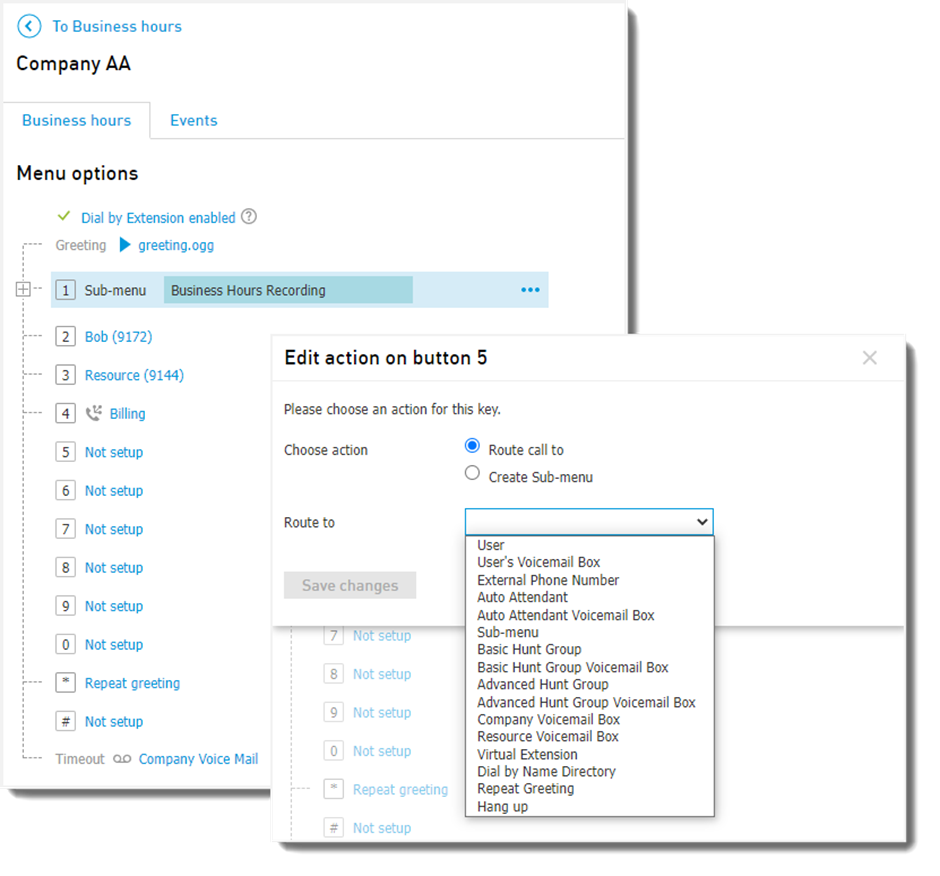
There are several actions that can be set up for a button:
Make sure you are on the Business Hours tab and navigate to the menu tree number to enable/disable the Dial By Extension.
Choose the routing:
Route to User: when selected, a drop-down is displayed to the right that lists all users who have an extension/phone number assigned. Select user to redirect the call to when a caller presses the corresponding key. Note: this option is not available if you do not have any users with extensions.
Dial By Name Directory: enables the options of Dial by name. After the Dial By Name Directory is enabled, make sure your greeting gives the caller instructions for which number to press to get to the Dial By Name option.
When the callers press the assigned Dial by Name option, they will hear the following recording:
"Please dial the first few letters of the first or last name of the person you are trying to reach; press pound when you are done; press star to return to the main menu".When one or more names are found, the following notification plays:
"For [name 1], press 1; For [name 2], press 2; etc".When no names are found, the following notification plays:
"We could not find any matching names. Please try again". Then the main Dial by Name greeting repeats:
"Please dial the first few letters of the first or last name of the person you are trying to reach; press pound when you are done; press star to return to the main menu".
Route to Basic/Advanced Hunt Group: when selected, a box is displayed to the right that lists all existing Hunt Groups. Select Hunt Group to redirect the call to when a caller presses the corresponding key. Note: this option is not available if you do not have any Hunt Groups created.
Route calls to User's Voicemail Box: when selected, a box is displayed to the right that lists all users on the account. Select the user to redirect the call to when a caller presses the corresponding key.
Route to Resource Voicemail Box: The call will be transferred to the resource voicemail box when a corresponding key is pressed. When selected, a box is displayed to the right that lists all resource voicemail boxes on the account.
Route to Auto Attendant: When selected, a box is displayed to the right that lists all Auto Attendants that are created. Select Auto Attendant to redirect the call to when a caller presses the corresponding key.
Route to Auto Attendant Voicemail Box: when selected, the assigned button will redirect the call to voicemail and the recorded messages will be sent to the email address if it is set up for Auto Attendant voicemail.
Route to Company Voicemail Box: when selected, the assigned button will redirect the call to voicemail and the recorded messages will be sent to the email address if it is set up for Company voicemail.
Route to Sub-Menu: when selected, user will hear the Sub Menu greeting (if it is set) and will be able to navigate through a set of options by pressing keys on a touchtone phone. Route to Sub-Menu option redirects to an existing sub-menu of this Auto Attendant. The list with sub-menus will be displayed. To create a new sub-menu you would want to select Create Sub-menu option.
Note: there is a maximum of 20 levels of Sub-Menus that you can sequentially createRoute to Main menu: When selected, the assigned button will redirect the call to the Main menu of these Business hours menu. This option will only appear under Sub-menu.
Route to Previous menu: This option allows transferring the call to the previous menu when the caller pressed the assigned button. This option will only appear under Sub-menu.
Repeat Greeting: when selected, the greeting of this menu or a sub-menu will be repeated.
Route to Virtual Extension: redirects the call to a virtual extension. When selected, a box is displayed to the right that lists all virtual extensions on the account
Route to external phone number: you can set up any phone number to forward calls after pressing the corresponding key.
Hang Up: Phone call will be finished.
Create Sub-Menu: user will hear the Sub Menu greeting (if it is set) and will be able to navigate through a set of options by pressing keys on a touchtone phone. You would need to create a new Sub-menu before choosing this option.
You may want to call the Auto Attendant phone number and make sure the options work as you want.
As you set options for the Auto Attendant, you will see structure appear below the Menu options.
Here are some tips one sub-menus:
When some submenu is created for a certain button you can use the Route to option of this sub-menu to route it to any other button.
This submenu can be edited just when it was created.
If the action for the button where the sub-menu was created was changed, another appearance of this submenu becomes editable. If you set up a submenu for some button (e.g. 1) and later you decided to move it to another button (e.g. 2):
Set the button 2 to route to the submenu
Clear or change action for button 1 Create Sub-Menu: user will hear the Sub-menu greeting (if it is set) and will be able to navigate through a set of options by pressing keys on a touchtone phone. You would need to create a new Sub-menu before choosing this option.